

Next Slideshow Low-Cost Bathroom Updates

Original article and pictures take http://www.bhg.com/home-improvement/advice/budget-advice/small-remodel-projects-add-value-to-rooms/#page=7 site
Next Slideshow Low-Cost Bathroom Updates


this 31-footer is powered by a “torpedo-shaped” 4.2-kilowatt electric pod motor juiced by eight Varta 12-volt marine batteries. That adds up to 14.7 kilowatt-hours of storage, enough to get Stephenson and company from his home at Henley-on-Thames to the Cotswolds about ten hours away, and back. Charging points all along the river mean he doesn’t need to sweat range, though. Plus, the benefit to traveling on a river is that at least

The boat itself is a combination of rosewood and mahogany from Africa and Brazil, laid up with fifteen layers of laquer when it was built and another five every year. As of this year it shines with 35 coats of protection.
(Source: beernutz132, via breezingby)


I used white (perfect for toddler clothing, right?) cotton because it was the only solid fabric I had on hand, but I think linen or voile would have been nice. It’s just ten rows of running stitches, with 1/4 inch between rows. I marked and stitched the rows before assembling the skirt. It’s a pretty mindless and relaxing activity, and a nice change of pace from sitting at the sewing machine

The plan was to turn it into a Lazy Days skirt or to use the Simple Skirt tutorial from Made, but I’ve sewn up lots of both and I wanted to try something new. I was hoping to find a tutorial for a skirt with a flat front waistband and elastic in the back, but nothing came up in my search. Then about eight hours later, Anna from Noodlehead posted that very tutorial for Skirt Week on Crafterhours. Amazing, I tell you. Thanks, Anna! I had a little trouble figuring out the elastic in the back, but it all turned out fine in the end. Since I was making a toddler-sized skirt, I shortened the height of the waistband pieces one inch from the tutorial measurements, resulting in a 1.5 inch waistband. Here’s the flat waistband, along with some tummy:


POW! Nutritional punch! Quinoa, tender spinach, and sweet cherry tomatoes join forces with bites of creamy avocado to bring it all together. I find it to be a perfect marriage of filling and energizing. I'm fascinated with the fact that it's so simple, yet the flavors seem so complex as you eat it. My head starts spinning at how many variations there could be. Add some beans for an extra protein punch, change up the veggies, or use fresh lemon juice in the dressing instead of red wine vinegar. Although I probably won't stray too far from this version because my

For more healthy salads, check out this list of 20 of our favorites!

Vegan, gluten-free
Ingredients
1 cup dry quinoa
2 medium avocados
3 oz. baby spinach
8 oz. cherry tomatoes
3 green onions
{For the dressing}
1-2 cloves garlic, minced (I use 2)
2 Tbsp. red wine vinegar
2 Tbsp. olive oil (omit for oil-free)
1/8 tsp. salt
Directions
Cook the quinoa according to package directions.
Meanwhile, make the dressing: in a small bowl whisk together ingredients and set aside.
Roughly chop the spinach and place in a large bowl.
Slice the green onions, halve the cherry tomatoes, and dice the avocado.
When quinoa is done cooking, add it to the large bowl with spinach and toss. The heat from the quinoa will lightly wilt the spinach.
Add the green onions, tomatoes, and dressing. Stir to combine.
Add the avocado and lightly toss.
Serve immediately or refrigerate to let flavors blend more.

Come join me on Instagram and share your creations! I love to see what you guys are cooking up! :)


When you venture into the world of boat building, you quickly realize that standard woodworking clamps are pretty limited in their functionality. The design of the woodworking clamp incorporates strength and pressure, and while that may be useful when building a cabinet, their shallow clamping depth is a hindrance to the the creation of water craft. That's where the lapstrake clamp comes in. It's designed with longer limbs that allow you to reach around the gunwales of the boat, but at the sacrifice of pressure, which, fortunately for us, isn't a necessity.
This is an instructable on a simple lapstrake clamp that can be knocked out in no time, using scrap material you have on hand, where you can take as much care as you want to make quality clamps, or just whip them out, as I did, so as not to delay my project. That's an important factor when you consider the amount of time that goes into boat building. You don't want to waste a day or two on building the tools to build your boat, when your actual project itself can end up taking you weeks if not months.
I'm using recycled pine from old pallets for mine, which is an unlikely wood to use due to its softness, but because of their simplicity of design, should I break one, I can replace it with three more in under 15 minutes. There's no rule on length. You can make one that's six inches, or 24 inches. It's your choice with the only consideration being the amount of pressure exerted at the clamping end.

Tools;
Materials;


First you need to cut your wood to length. I ended up creating two types of clamp. One that was 10" that gave me more pressure at the clamping end, and six more that were 16" that gave me the reach I needed.
Next, use your combination square to draw out two lines on each end of your piece, roughly 1.5" apart. Then draw another line down the length that divides your board, roughly,


This process is pretty simple. For the inside angle, you're going to need to drill a hole at each corner to allow your jigsaw to make the turn, but all in all it's follow the lines to get your 'C' shape. For safety, you should clamp your board down and cut one end at a time. Now honestly, I started that way, but it was annoying clamping and re-clamping, and I had time constraints, so I just freehand cut them, however I don't recommend doing that.


This job I did on the table saw, but it can be handled by the jigsaw or by hand saw, and honestly, I didn't even bother to measure what I was removing. I just set the saw guide to half the width of the wood (leaving consideration for the thickness of the blade), and cut through one of the angles of the 'C' till the blade reached just under the top edge of the wood.
Next I used my coping saw to slice off one side of the split, keeping in mind that, as a hinge you need to slice off the opposite side to marry them up.


The hinge is simple. I used my belt sander to round the ends first, but that's not entirely necessary. If you're in a hurry to get back to your boat building, you can leave them squared. Just set your two ends overlapping at roughly the angle you want them to be, then drill. You can install your hex bolt right away with a washer before the nut, but leave it loose for now.
Once you have your hinge made, you need to make sure your clamping end is flush. We've left the nut loose because we're going to overlap the clamping end, hold them in place and cut straight through them. I did this on the table saw for speed, but again, any saw will do as long as you cut relatively straight. Now, your clamp ends should marry up perfectly, so you can tighten the bold on the hinge.
Finally, You need to drill the hole for the adjustment stove bolt. There's really only one consideration here; The closer to the clamping end, the more force that is exerted, while placing it closer to the hinge end will give you more reach.
When you've measured and drilled your holes, you'll need to ream the hole on one limb wider to allow for play in the bolt so that the jaws can actuate with the bolt in place. I simply drilled several holes in a line, then connected them into a channel using my jigsaw, but again, if your plan is to create a more 'quality' clamp, you can carefully mortise it using chisels and a hammer.


When your holes are drilled, you can install your adjustment stove bolt. Put it through one limb then tap it down so it 'sets' into the drilled hole. Next, put a washer and nut to lock it to that limb. finally, bring the jaws together with the bolt going through the widened hole and put another nut and washer on the end. You can substitute a wing nut if you want to make your clamp adjustable by hand, otherwise you'll need a wrench to tighten and loosen it.


That's it. They're quick and dirty, but they get the job done without taking away much of your precious building time. Again, the design can be used to create quality clamps that will last a lifetime, to be handed down from generation to generation, or if you're like me, and don't want to waste time, it can be used to make a tool that will speed up the progress of your project, improve its quality, but most of all, won't cost you much time to fabricate.
Again, thanks for checking out my instructables. I hope you find it useful.


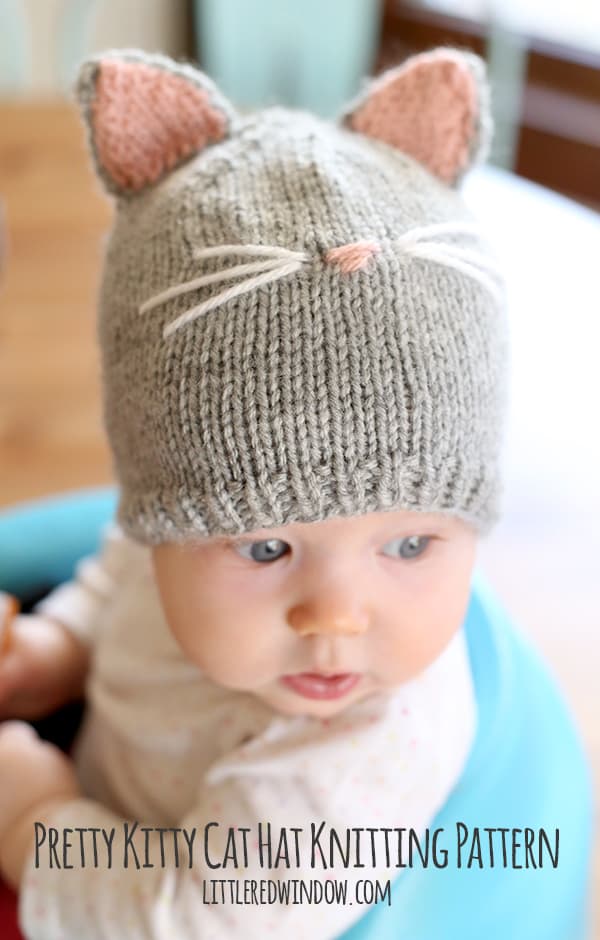
Did you know that when O was a baby we had two cute little cats that lived with us? They had to move in with friends when he was about 1 and we discovered he was allergic to them. But they were such sweet cats. We adopted them at 6 weeks old from an amazing no-kill shelter in Chicago, they had been found in an alley alone and were brother and sister. I still miss them. I do not, however, miss the fur everywhere! Anywhere they were adorable little gray kitties named Hiro and Yuko and because they were brother and sister they looked really similar, as kittens we could only tell them apart by their noses. Hiro had a little black nose and Yuko had a little pink nose. So when I decided to make Baby V a kitty cat hat, it definitely had to be gray with a little pink nose. But you could make yours whatever colors you want! Scroll on down to get this cute free pattern!

Note: I am frequently asked for a printable version of this Kitty Cat Hat pattern. The free pattern is available below in 6 months size but I also made you an optional ad-free super easy and handy printable PDF version of this pattern to print and keep in your knitting bag. Click the button below to get your copy. The PDF printable version also contains additional instructions for sizes 0-3, 12 months and 2T+as well as 6 months)! The PDF is an instant download and will be available to download and print as soon as you complete your purchase. The small fee for this PDF version helps me keep Little Red Window running! Thank you so much for loving my patterns! Keep scrolling down for the free version!
Below is the free version of the Pretty Kitty Cat Hat Knitting Pattern, click HERE for an upgraded easy-to-print PDF version with additional size options including 0-3 months, 6 months, 12 months and 2T+!
Pretty Kitty Cat Hat Knitting Pattern (6 month size, see PDF version for additional sizes!)
Gauge: 20 stitches = 4 inches
(If you need help, my favorite knitting reference book for everyone from beginners to advanced knitters is ssk
Row 6: purl all stitches
Row 7: k2tog, k4, ssk
Row 8: purl all stitches
Row 9: k2tog, k2, ssk
Row 10: purl all stitches
Row 11: k2tog, ssk
Row 12: p2tog
Cut yarn, pull through loop and weave in that end.
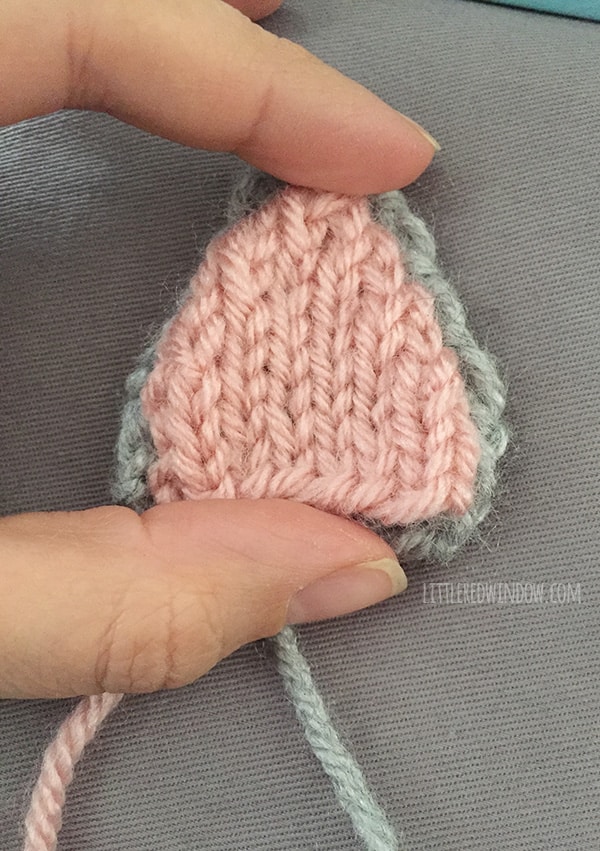
To knit the inner ears (make 2):
Using double pointed needles as straight needles, cast on 8 stitches with pink yarn, leaving a long tail to stitch the inner ear to the outer ear.
Row 1-3: purl all odd rows, knit all even rows
Row 4: k2tog, k4, ssk
Row 5: purl all stitches
Row 6: k2tog, k2, ssk,
Row 7: purl all stitches
Row 8: k2tog, ssk
Row 9: p2tog
Cut yarn, pull through loop and weave in that end.
To assemble the hat:
First use the long tail on one pink inner ear to whipstitch it wrong (purl) sides together to one gray outer ear. Make sure your stitches don’t show through to the other side of the outer ear. Knot the yarn and weave in the end. Repeat with the other ear parts.


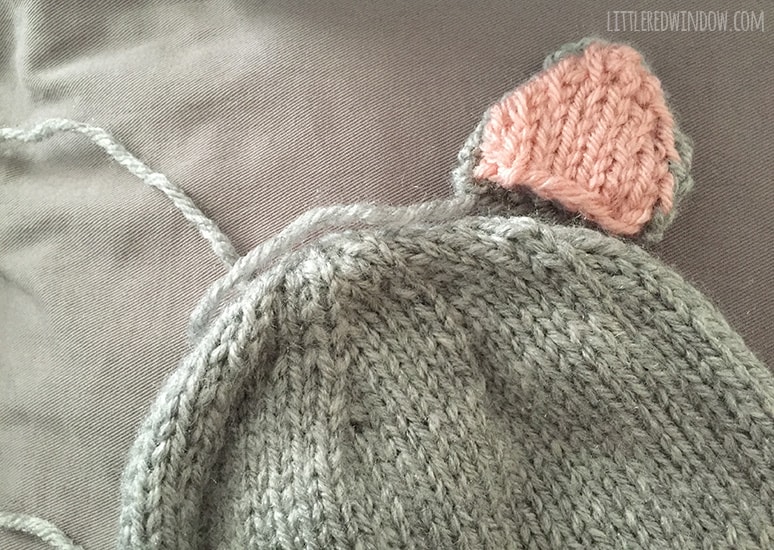
Then use the long gray cast on tail to attach the ear securely to the top of the hat on either side. Make sure to attach it well, babies pull on things!
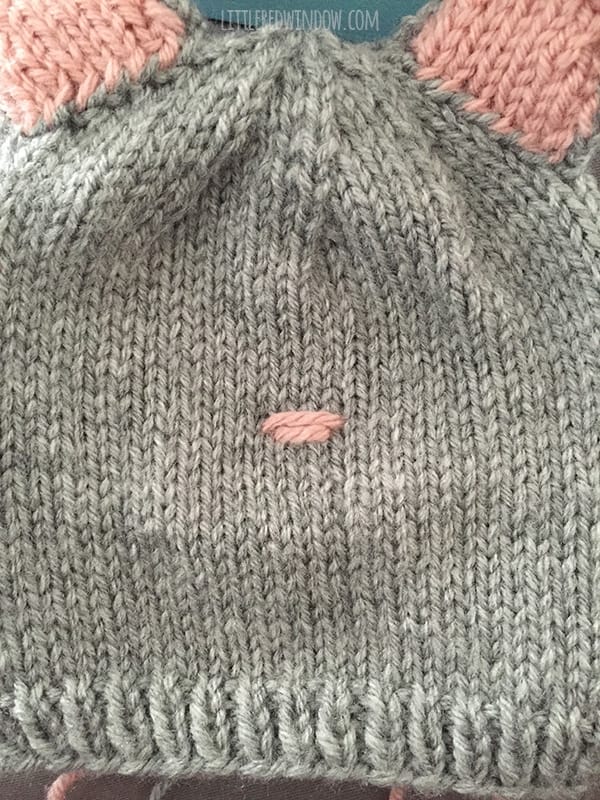
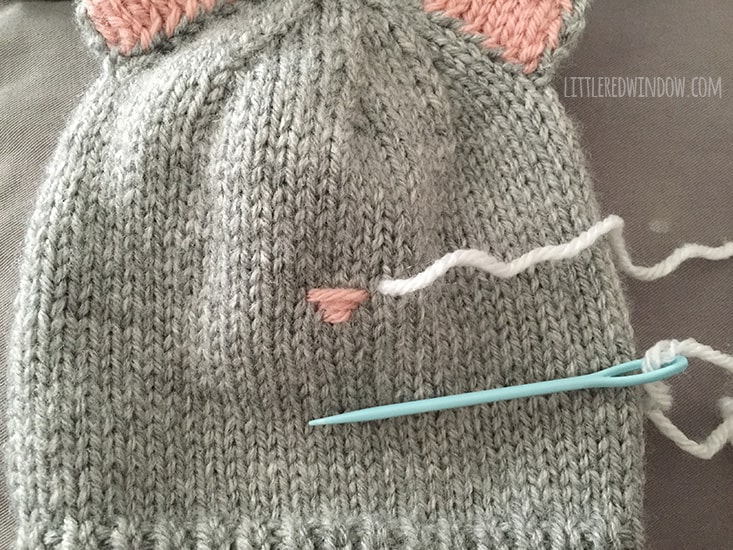
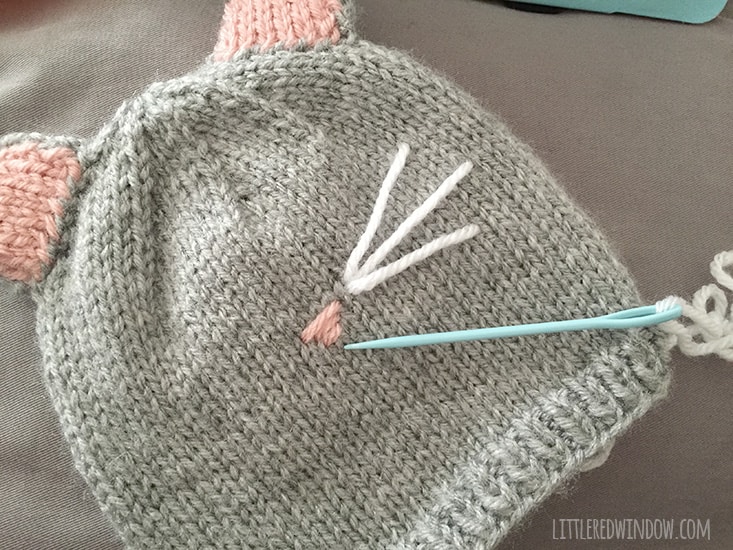
To stitch the nose


Use a yarn needle and a length of white yarn to stitch the whiskers. Just make sure that you stitch them fairly loosely because when you put the hat on the baby it will stretch. If the whisker stitches are too tight they will pull and look terrible. Knot and weave in ends on the inside of the hat.

Now doesn’t your little kitty cat hat look purrrr-fect? (I couldn’t skip a pun opportunity could I?) Enjoy!
The PDF printable also contains instructions for sizes 0-3, 12 months and 2T+!