Tiny free-form stitches – layered and layered on the front of a garment to be constructed next week at craft camp.
I have a box full of these little embroideries. Modern boro that has been started and not finished. A constructed skirt that was started but put
to one side as the denim is too unyeilding. A larger piece that was coming along beautifully until life got in the way and I somewhow can’t catch the muse that inspired the beginning. They will all be finished one day – and there is beauty in that as well – a nod to the origins of Boro that came from mending, an appreciation of wabi-sabi, and the evolutionary nature of this kind of art form.
A recent inspiration came from Annekata, and her link to Junko Oki’s work, which had me pick up the needle again and sit by the fire on a cold weekend, in the company of Oscar who was more than happy to chill out and relax with me.
A storage area in your basement in garage doesn't have to be expensive or complicated.
This is what your storage room could look like with easy to make and inexpensive shelves.
Each shelf is 8 feet long and 2 feet wide to minimize cutting of materials. They are easy to assemble from 2 x 4's and 1/2" osb. The big box stores can cut the osb down for you at little or no charge.
This is how the shelving unit looks when completed..
We spaced the shelves to fit our storage containers in order to maximize our limited storage space.
","discussion":{"numPages":1,"confidence":0.254742016520957,"diffbotUri":"discussion|3|-1536335674","pageUrl":"http://www.hometalk.com/624367/easy-storage-idea?utm_medium=pinterest","numPosts":5,"type":"discussion","title":"How Do You Store Your Stuff?","posts":[{"date":"Wed, 06 May 2015 00:00:00 GMT","humanLanguage":"en","author":"Yvonne Schoen","authorUrl":"http://www.hometalk.com/yvonneschoen1","diffbotUri":"post|3|1679654646","html":"
FOR LABELING, I USE MY BROTHER LABELING MACHINE. LOOKS NEAT AND YOU CAN KEEP TAPING OVER IF NEED BE.
","pageUrl":"http://www.hometalk.com/624367/easy-storage-idea?utm_medium=pinterest","id":0,"text":"FOR LABELING, I USE MY BROTHER LABELING MACHINE. LOOKS NEAT AND YOU CAN KEEP TAPING OVER IF NEED BE.","type":"post"},{"date":"Wed, 20 May 2015 00:00:00 GMT","humanLanguage":"en","author":"Teri","authorUrl":"http://www.hometalk.com/teri170","diffbotUri":"post|3|152159003","html":"
We built shelves very similar to these for our basement. However, we put peg board on the sides to hang other items on. (electrical cords, tools). We are going to make another one like it and place them back to back with about 3 feet between the
","pageUrl":"http://www.hometalk.com/624367/easy-storage-idea?utm_medium=pinterest","id":1,"text":"We built shelves very similar to these for our basement. However, we put peg board on the sides to hang other items on. (electrical cords, tools). We are going to make another one like it and place them back to back with about 3 feet between the","type":"post"},{"date":"Wed, 01 Jul 2015 00:00:00 GMT","humanLanguage":"en","author":"Cindy","authorUrl":"http://www.hometalk.com/cindy1189","diffbotUri":"post|3|-674246447","html":"
I just wanted to say thank you for the plans for these shelves! I made 2 units this weekend for my garage and we love the size and the storage they provide!! Thank you!!
","pageUrl":"http://www.hometalk.com/624367/easy-storage-idea?utm_medium=pinterest","id":2,"text":"I just wanted to say thank you for the plans for these shelves! I made 2 units this weekend for my garage and we love the size and the storage they provide!! Thank you!!","type":"post"},{"date":"Mon, 07 Sep 2015 00:00:00 GMT","humanLanguage":"en","author":"Christopher M. Bowers","authorUrl":"http://www.hometalk.com/christophermbowers1","diffbotUri":"post|3|-717410736","html":"
Fantastic. Making these now. Soon I'll be super organized! I'm filling my basement with these. These only cost me 60 bucks each and they are sturdy as all get out. Way higher quality than the particle board crap they sell for $100. Thanks so much for
","pageUrl":"http://www.hometalk.com/624367/easy-storage-idea?utm_medium=pinterest","id":3,"text":"Fantastic. Making these now. Soon
I'll be super organized! I'm filling my basement with these. These only cost me 60 bucks each and they are sturdy as all get out. Way higher quality than the particle board crap they sell for $100. Thanks so much for","type":"post"},{"date":"Thu, 21 Apr 2016 00:00:00 GMT","humanLanguage":"en","author":"UdyRegan","authorUrl":"http://www.hometalk.com/udyregan","diffbotUri":"post|3|554298310","html":"
I don't think my storage room will ever look this organized in a million years. There are really way too many odds and ends and funny shaped things for them to all fit so nicely inside boxes like this. And I can't imagine the amount of work you need
Original article and pictures take http://www.hometalk.com/624367/easy-storage-idea?utm_medium=pinterest&utm_source=rpt&date=20160704 site
Firstly grab your fabric (Have it folded in half so that the folded edge is at the top), we need to work out the length you want, as you can see by my pics this is not an exact science, I was making this for my little girl so went off one of her shirts and added a bit extra (I probably could have added a wee bit more, you’ll see the finished one on her though and can decide if you want to allow extra).
We then need to create the semi-circle, what I did was use a length of string/cord as a guide, I tacked it to the work bench just above the fold and cut it at end of the fabric which is the length I decided to use.
You can then swing your string around (keeping it taut) and you will get an even semi-circle, Hold a piece of chalk at the end and draw a guide line on your fleece (I say chalk as it washes off extra easily). You can then cut this semi-circle out.
We are then going to cut out a head hole, Use a round bowl
or pattern to trace around, use whoever will be wearing it for a guide for the size, If it’s a little big (as mine was) that’s ok because this design allows for a tighten up with a drawstring.
To make the edges prettier draw an inner circle with chalk to mark for your tassels (personal choice here) Mine were about 4 cm (the smaller you make them the harder it is to tie the knots in the next step, I wouldn’t go shorter than 4cm for that reason). Cut up to your line and then knot off each individual tassel (The thinner you’ve cut the tassels the longer this will take).
I then decided to add a decorative edge to the neck hole, I made splits all the way around which I could then thread more fabric through. I cut the edging from the same fleece blanket, it had a nice edge and the colour matched.
I weaved my edging in and out of the slits and tied off at the end.
Original article and pictures take http://jamconcepts.com.au/no-sew-girls-fleece-poncho/ site
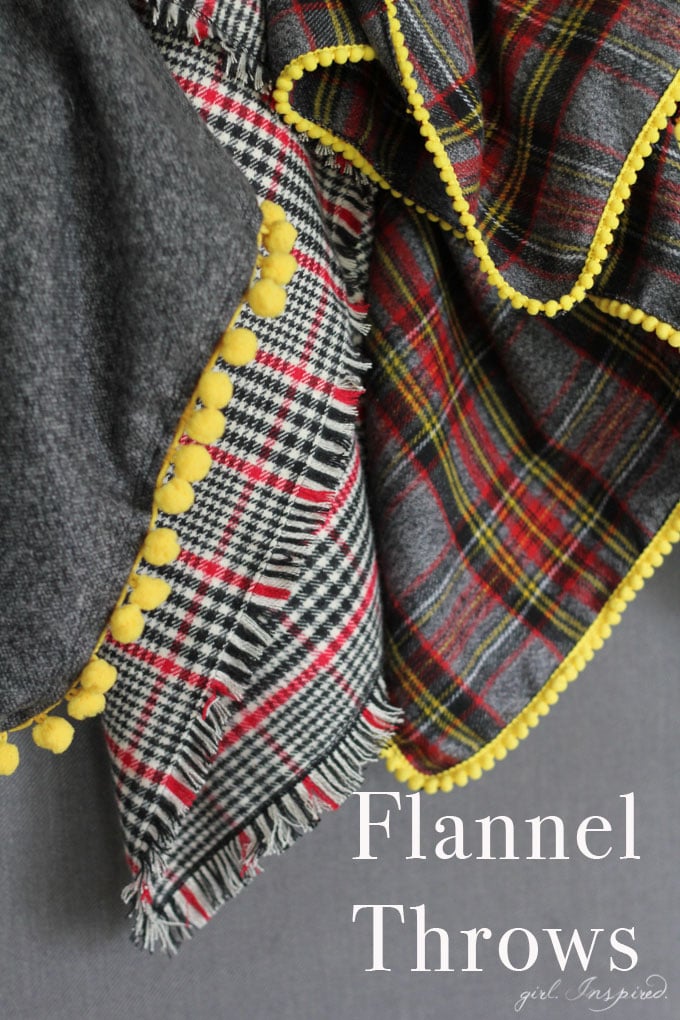
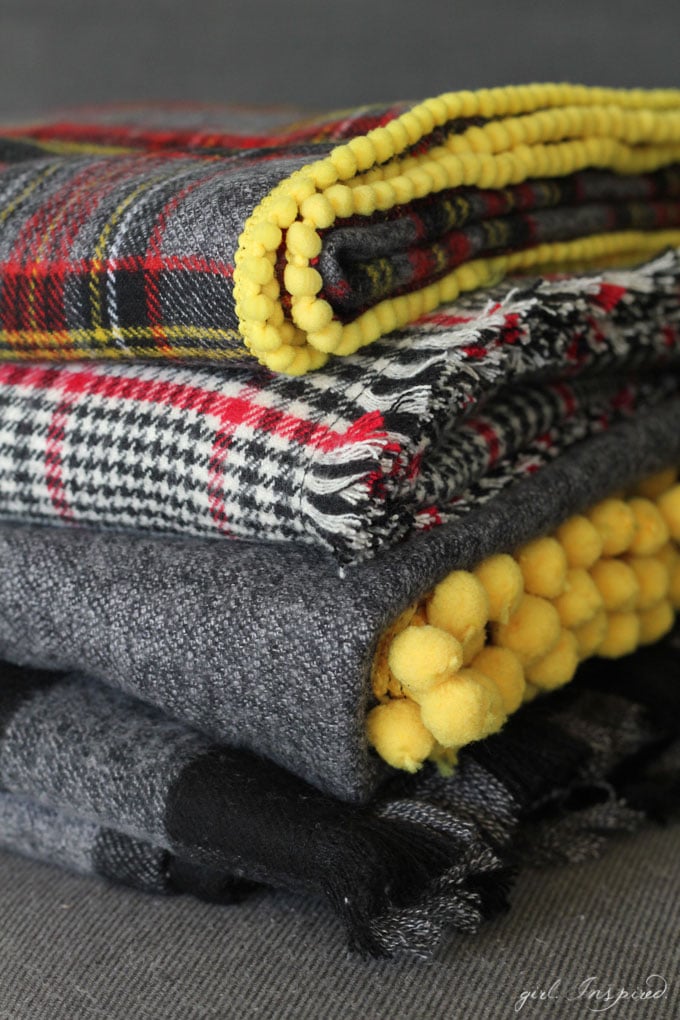
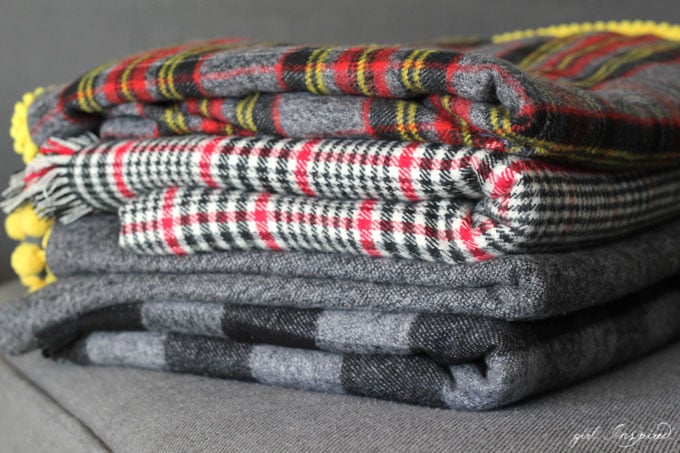
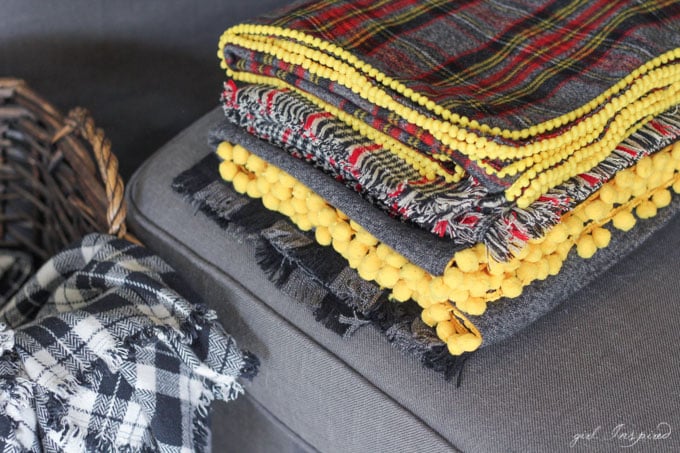
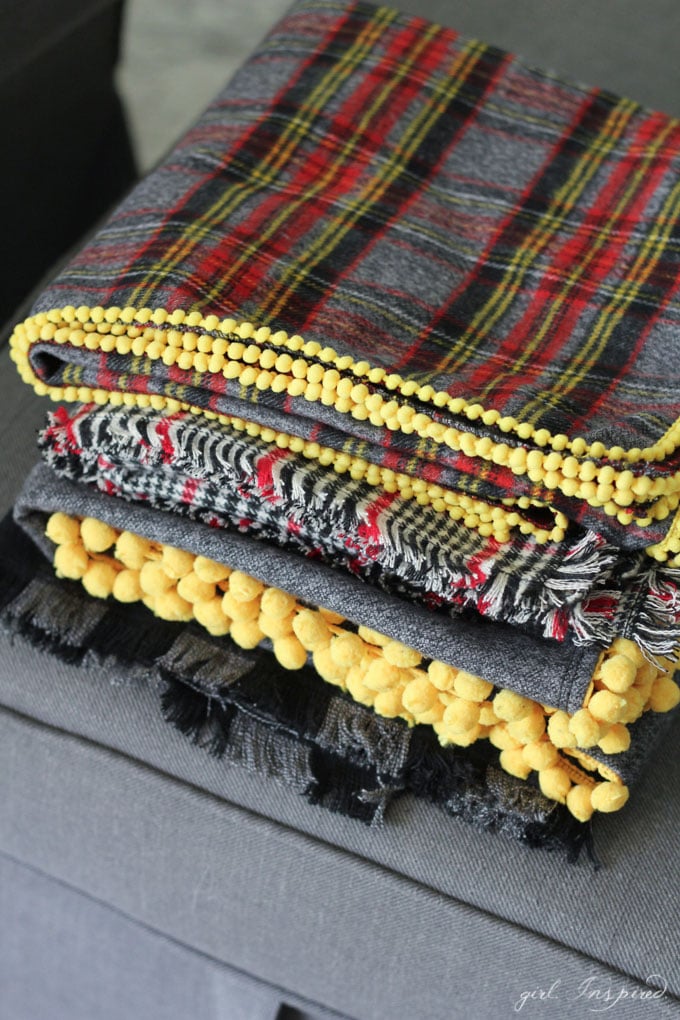
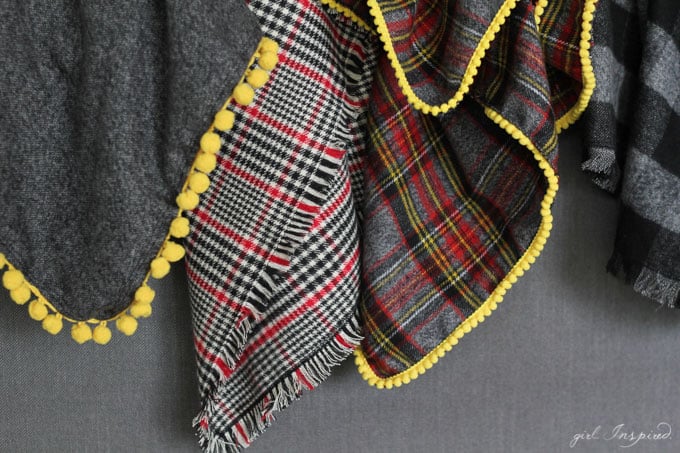
FLANNEL!! Are you as obsessed as I am? I want all the flannel things! Last winter, I made a simple flannel fringe blanket and we’ve used it throughout the year – you can find the tutorial for that flannel fringe throw by clicking here. I wised up this Autumn and made a fresh stack of easy flannel throw blankets – one for every member of the family! They are soft and cozy and the cheery patterns and trims make the stack look great even when they’re not in use!
This project is so simple because the flannel is soft on both sides and is the perfect weight to use as a single layer which means that the only thing you need to do is finish the edges of your cut of fabric! Today, I’m going to show you how to finish the edge with a couple different types of trim. Also, I’ll show you a different style fringe that can be made with a coverstitch machine for optimal ease and a professional finish!
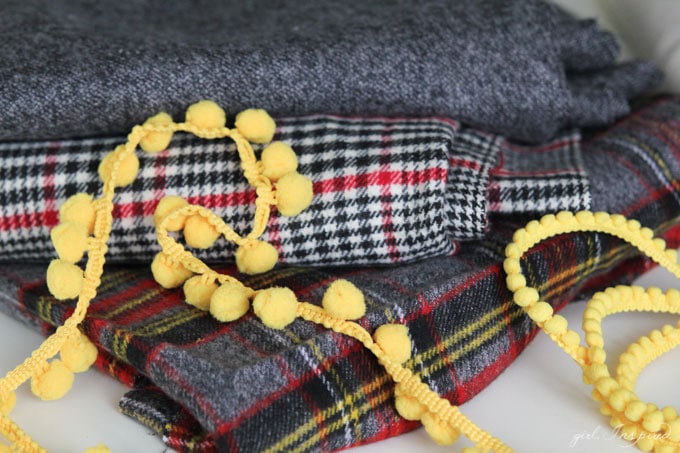
For each blanket, you will need:
2 yards of flannel shirting (44/45 inches wide) – you can alternately have it cut 44 inches long to make a simple square, which is a great size for kids!
Matching thread for sewing machine and/or serger
Pom-pom trim – enough to go around the perimeter – about 20 feet or 7 yards for the 2 yard x 44 in. blanket
Mini puff ball trim – about 20 feet or 7 yards
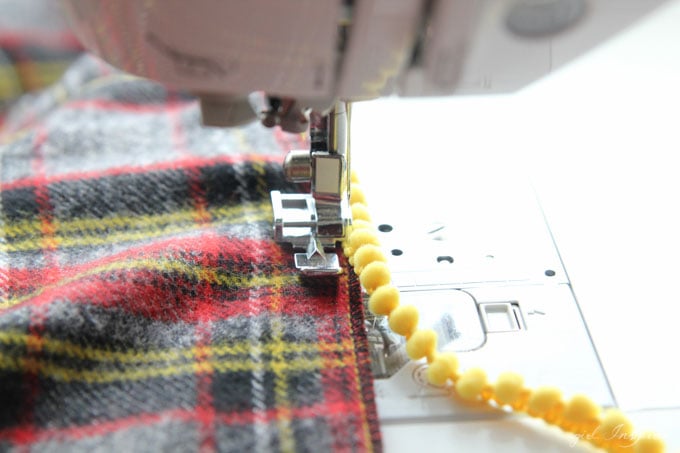
Let’s get started! Since you will have the fabric cut to size by the store cut counter, there’s no need to prep the fabric – you can pre-wash and dry if you’d like, though it’s not necessary for the fringe style throws. For the throws with trim, serge the edge first and then wash/dry your fabric to prevent fraying. If there is fraying after washing, you can trim the edges before you begin. For the mini-puff trim, serge a rolled edge around the four sides of the blanket. Then, using your zipper foot on the sewing machine, align the trim with the edge of the blanket and topstitch it to secure it all the way around. This is simple, but takes
patience as you will need to slowly sew while holding the trim in place along the edge. Adjust the position of your sewing machine needle to make it easier to reach over and catch the edge of the trim.
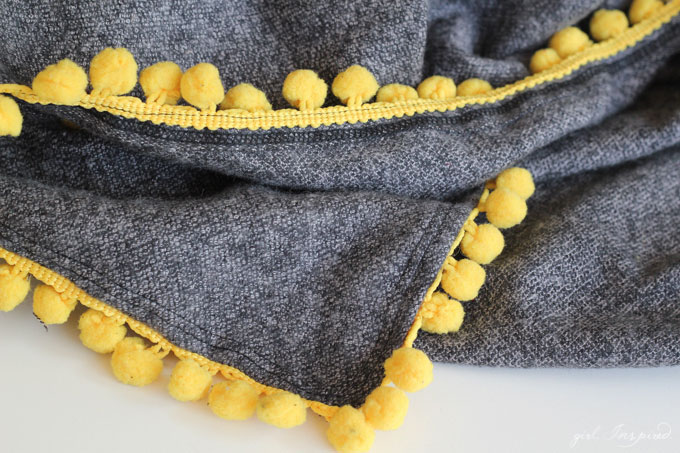
For the larger pom trim, you have two options. One – serge the edge and then top stitch the trim, right sides facing, around the perimeter of the throw. Align the trim close to the raw edge, but be sure that your stitches lie to the inside of the serge stitches so that the serging doesn’t show once you turn your trim under. Or Two – Here, I’m going to use a cover stitch machine to topstitch and simultaneously finish the under side raw edge of the fabric, so I’ve placed the trim about 3/8″ to the inside of the raw edge and I’m using a zipper foot to stitch the pom trim to the fabric.
Flip the raw edge to the backside of the fabric and top stitch or cover stitch around the perimeter of the throw.
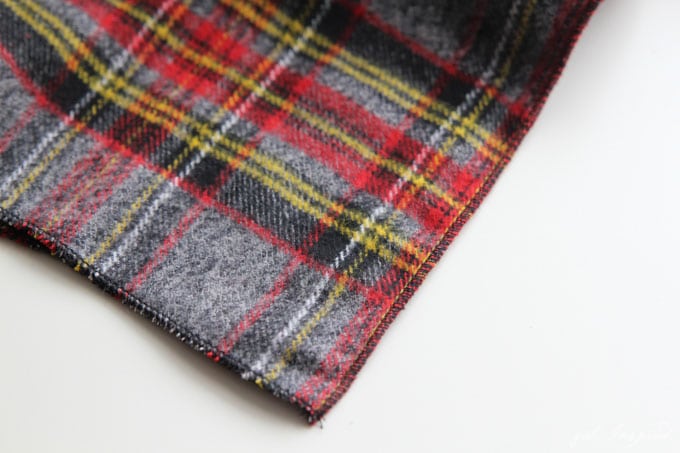
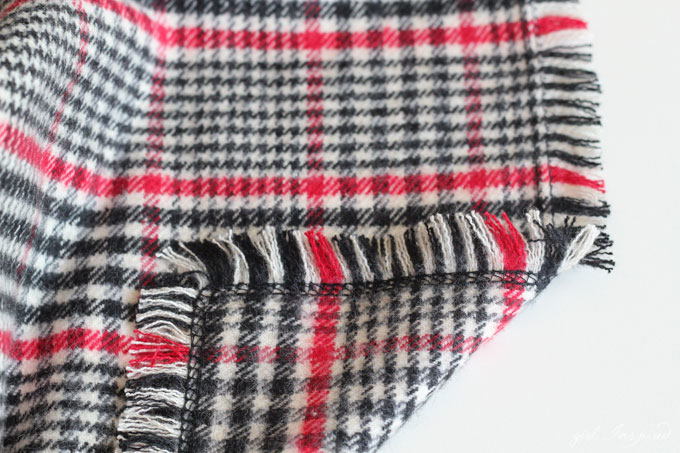
Finally, for a professional-looking fringe throw, cover stitch around the perimeter of the flannel, stitching approximately 1″ inside the raw edge (or more if you’d like more fringe!) The stitching will secure the fabric and provide an even border for your fringe. To make the fringe, simple remove the fabric threads that are woven together until you’ve unwoven the fabric back to the stitched border. You will need to shave off the selvage edge of the flannel with scissors or a rotary cutter prior to unweaving the fabric. This fringing task take a bit of time, but it’s a cathartic activity in front of the television or in the carpool pick up line and I found it very satisfying!
Now fold up your stack of snuggly blankets feeling prepared for the Fall!
I hope you love this simple project as much as my family does! Be sure to check out the basic Flannel Fringe Throw tutorial which you can complete with just a basic sewing machine!
Easy DIY Outdoor Cushion Covers | DIY Joy Projects and Crafts Ideas
Need some new outdoor cushion covers but can’t find what you want for the price? DIY cushion covers are awesome, because they cost a fraction of what it would to buy them, you get higher quality fabric, and can choose the colors and patterns of your choice. I never see patterns I absolutely love in stores, anyway, so I knew this was the next DIY project for me. Follow the super clear, detailed video tutorial and then reference our step by step photos to get the perfect outdoor seating- DYI style so you can really enjoy spring and summer in your backyard or on your porch.
Easy DIY Outdoor Cushion Covers
What you need:
1. Materials List
Decorative Fabric from Sailrite (we used Sunbrella #58023-0000)
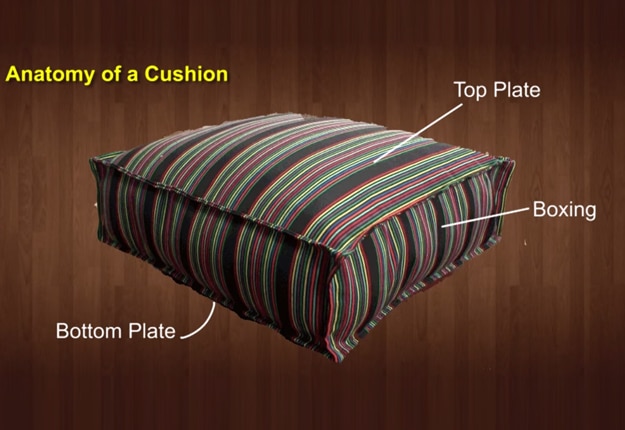
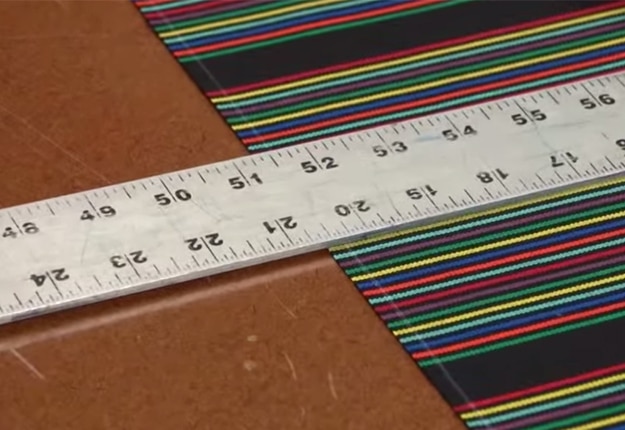
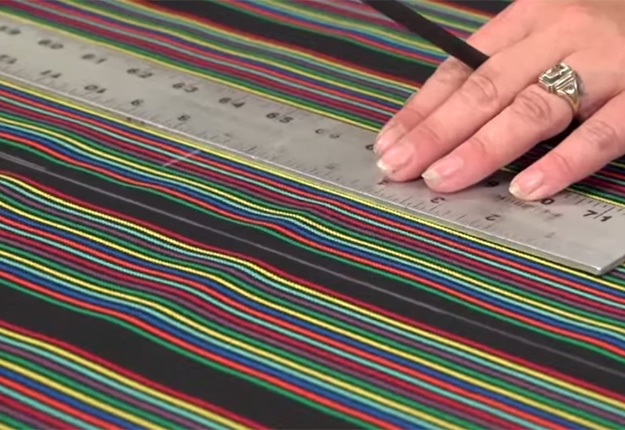
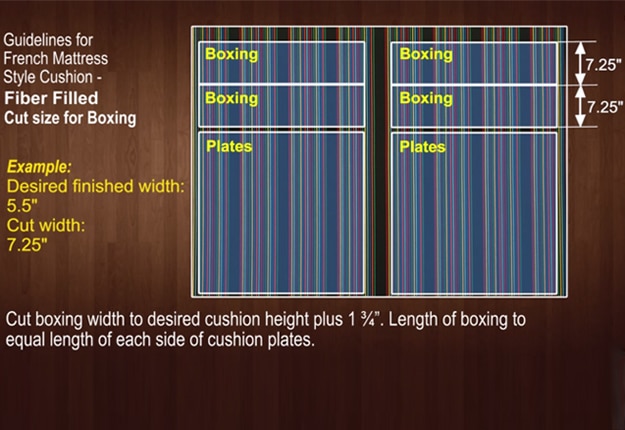
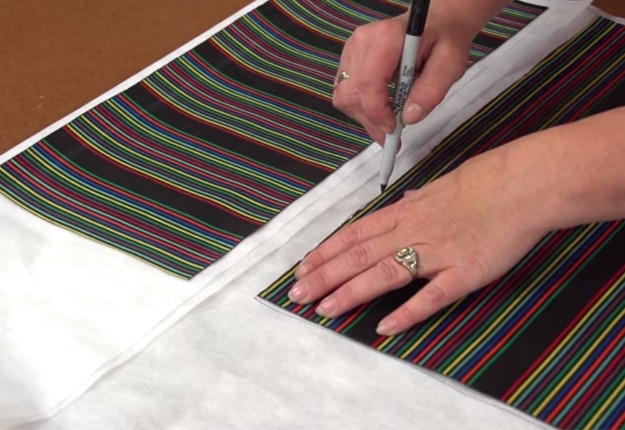
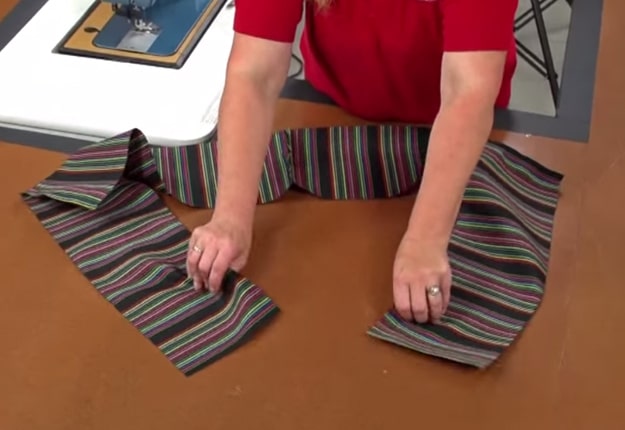
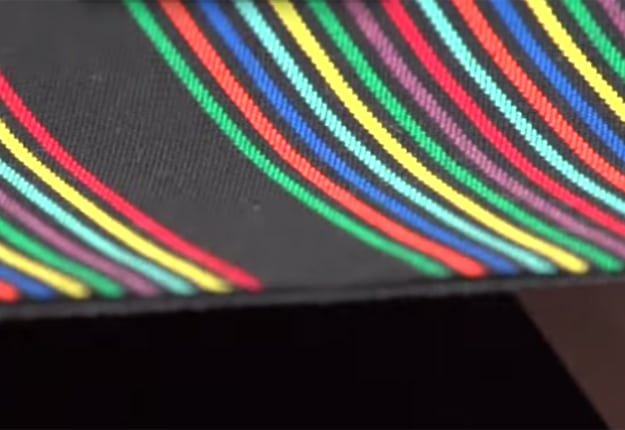
When marking along the width of the fabric the location of the stripes must be taken in to consideration for the second plate panel. Here is where the first plate started and that’s also the location where we want the second plate to start so the repeat is the same between top plate and bottom plate. If you’ve done it correctly the end point of the second plate should fall on the same strip as the end of the first plate we made.
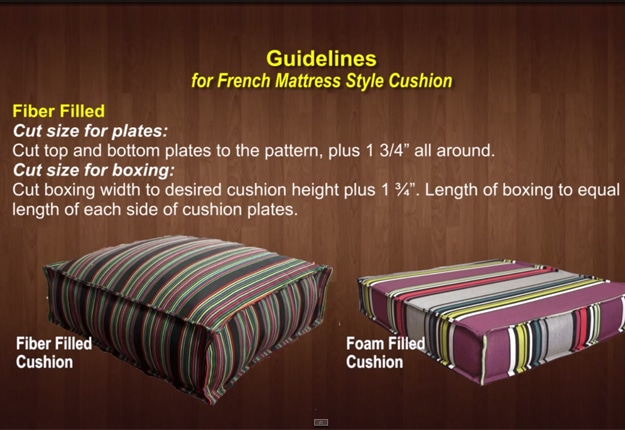
Next we need to mark for the boxing in both width and length.TO calculate the width of the boxing we need to add 1 3/4 inch to the desired finished width of boxing that you want. This extra amount will account for the mattress style seams.
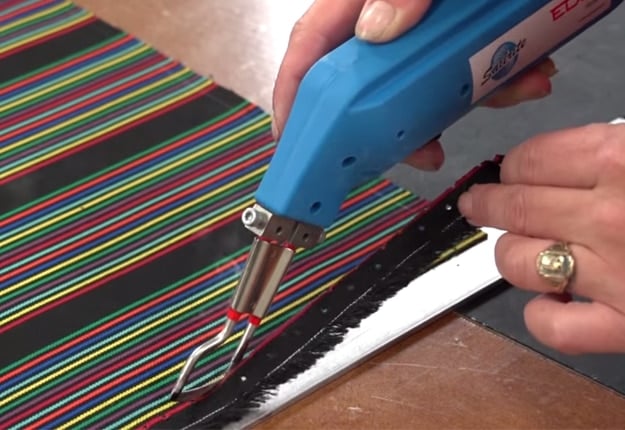
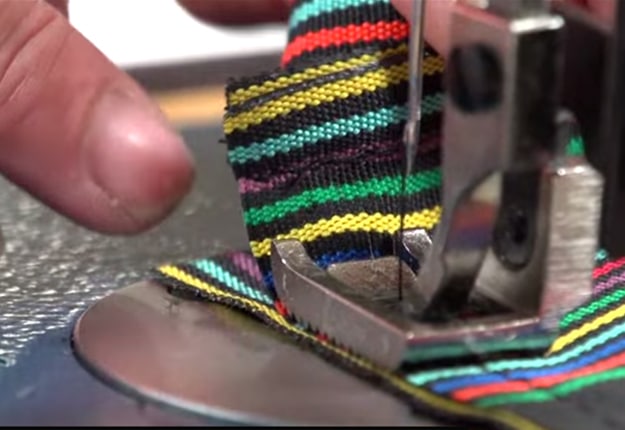
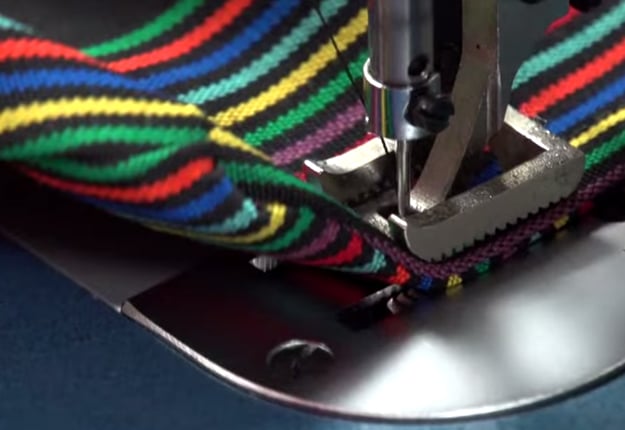
We are cutting the fabric using a hot knife. this seals the edge of the synthetic fabric preventing the unraveling of the fabric. Do this on top of a metal ruler to prevent damage to the table top below the hot knife.
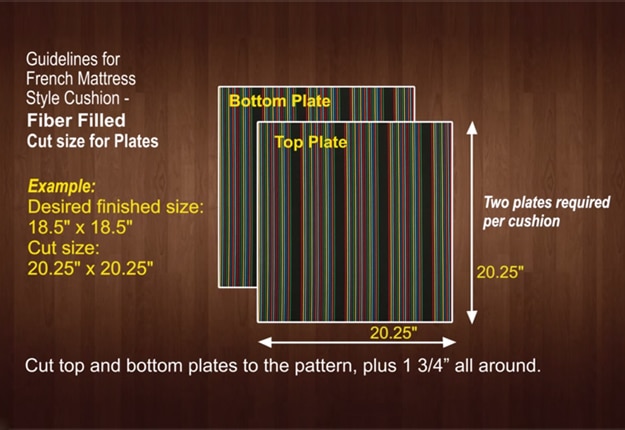
Now that our patterns are done, lets now proceed to the second part of the tutorial. for fiberfill. If you’re not gonna use fiberfill please skip this part.
Patterning Insert Fabric (Fiberfill only)
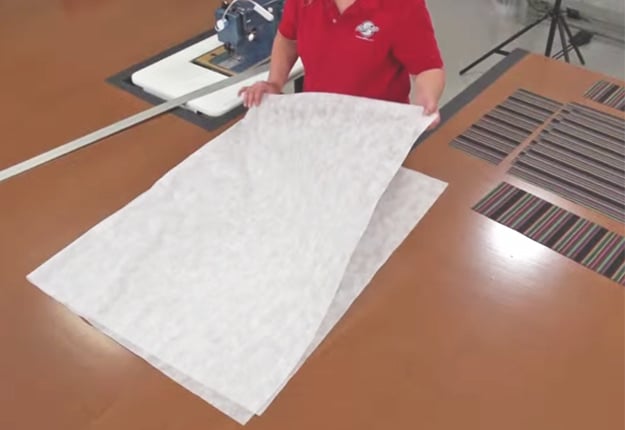
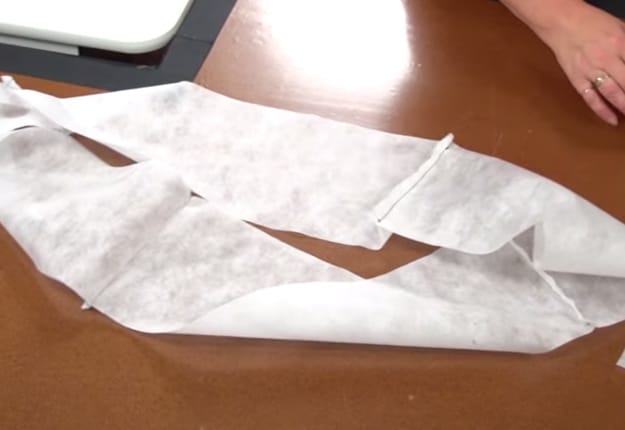
Since this cushion will be filled with a polyester Fiberfill we want to make a pillow insert which will house the fiberfill. To make this we will use spun bonded pillow protector fabric which is in expensive, breathable, water repellent and soft.
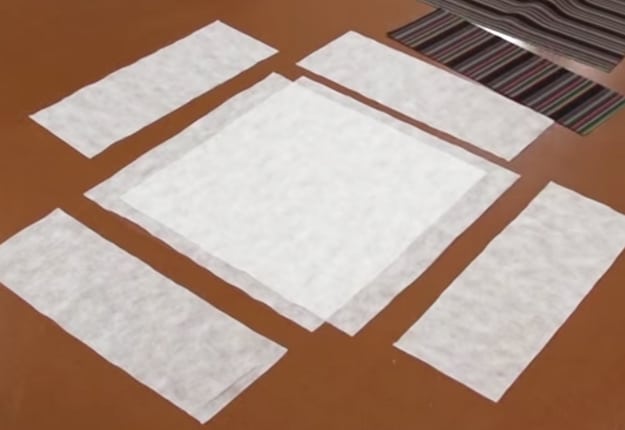
Fold the spun bonded fabric in half then fold it over one more time to a width slightly larger than the width of the boxing. Then trace around a plate and a boxing strip. We will get two plates and 4 boxing strips all at once when we cut it out. This plates and boxing strips for the pillow insert do not need to be extremely accurate in size since they just use to house the fiberfill.
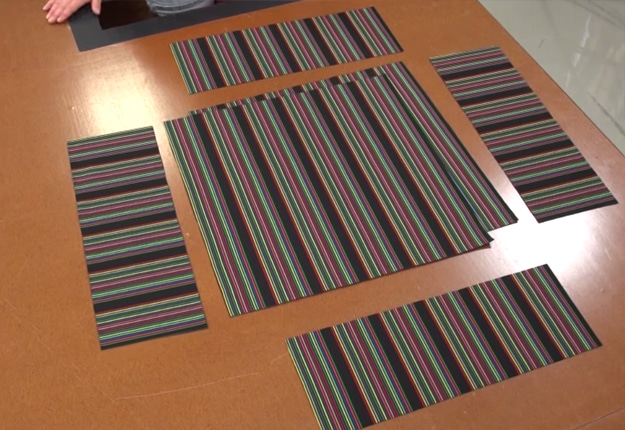
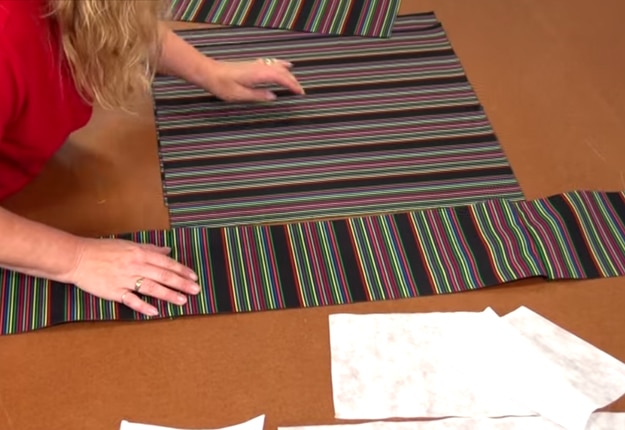
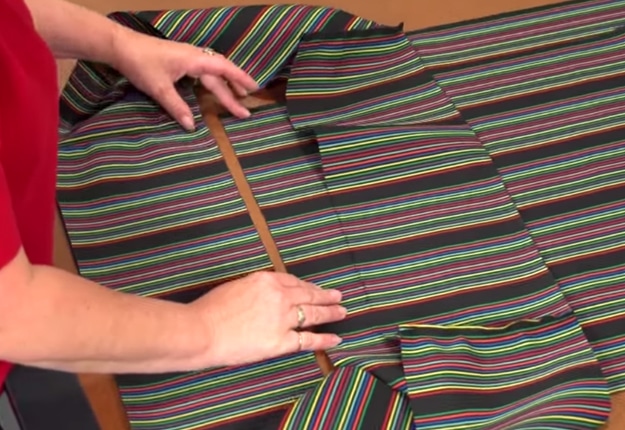
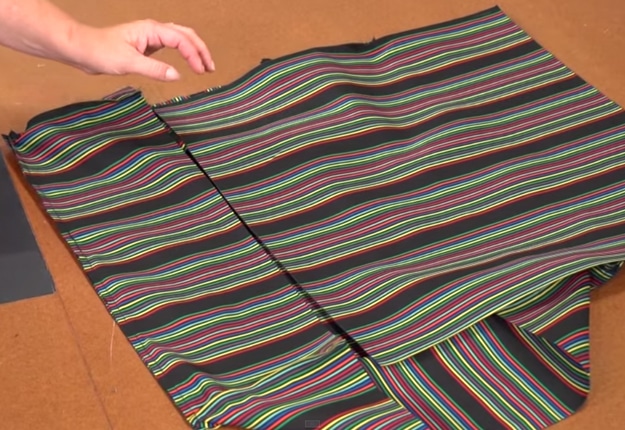
We now have all the plates and boxing strips cut for our cushion in both the decorative fabric and spun bonded cushion pillow protector. lay the fabric panels out in an organized fashion to reduce the chance of mistakes.
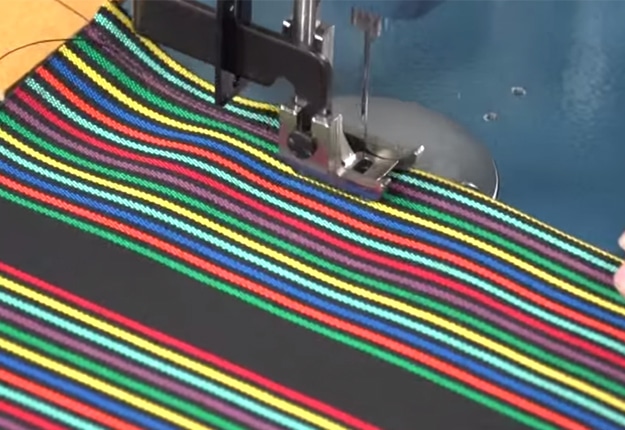
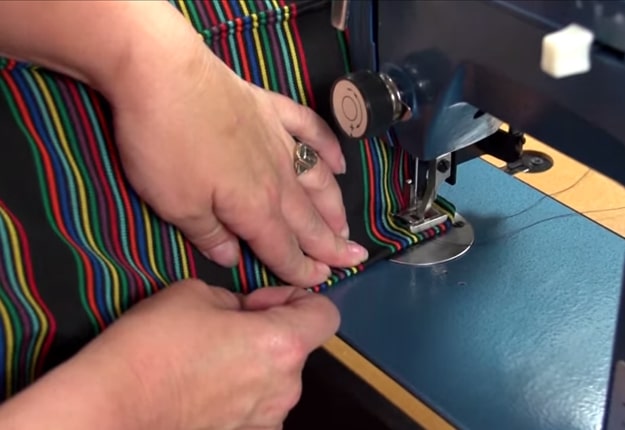
Start with the boxing and lay the corresponding boxing strip onto the oppposite leg so outside surfaces are facing each other. then sew the two strips together along the short end with a straight stitch about 3/8 inside the raw edges of the fabric. Be sure to do some reverse stitching at the beginning and the end of your stitch to lock the stitch in place.
Once all 4 boxing strips are sewn together,its time to join them together to form a complete chain. Be sure the outside surfaces are facing each other and sew along the end that completes the chain.
Now take the boxing assembly over and line it up with one of the plates so the strips are all even. FLip the boxing over so outside surfaces are facing each other and the edges are even.
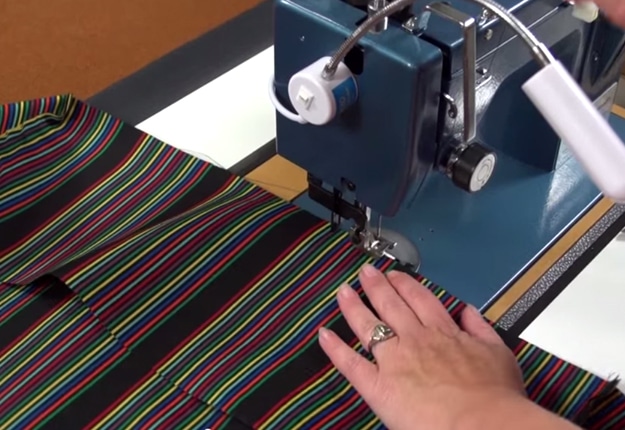
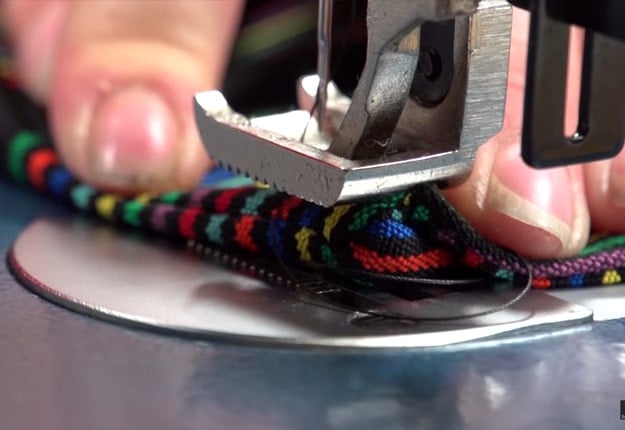
We will start sewing near the center position on the side. We will use a straight stitch. set at about 6mm in length and sew about 3/8 from the edge of the fabric. Be sure to line up the strips and the edge carefully as you sew.
Once you get to the corners, bury your needle to the thickest part of the shaft and lift the presser foot. Rotate the the fabric on the corner and then lower the foot and continue to sew down the leg. Because the sides does not have stripes that match the plate, we can’t use them line up the boxing to the plate.
Now that the boxing is joined in one plate, we simply need to sew the assembly to the last plate. To do this, line up the plates so that the stripes match on the two sides. Be sure the outside surfaces are facing each other. It is easier to sew the assembly with the boxing on the top and the plate on the bottom.
Start sewing 2-3” away from the corner to leave room for the insertion of the cushion or foam. Sew around securing the boxing to the last plate.
How-to-Make-a-French-Mattress-Style-Cushion-20 | DIY Projects & Crafts by DIY JOY at http://diyjoy.com/diy-furniture-outdoor-cushion-covers
Step 3
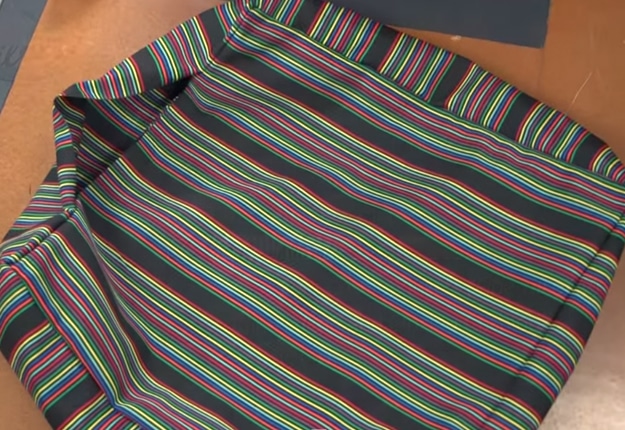
Check to make sure the stripes match up. When you reached the last side, go around the corner and stop sewing about 3” away from the corner. This leaves an opening for the insertion of the foam or insert in a later step. Do some reverse stich to lock the stitch in place and keep it from coming apart when the insert or foam is pushed inside the cover.
Sew the mattress style stitch along all sides and even in the corners of the cushion cover. To do this, fold the fabric out flat along each seam and try to position the seam at the extreme center edge of the folded assembly.
How-to-Make-a-French-Mattress-Style-Cushion-23 | DIY Projects & Crafts by DIY JOY at http://diyjoy.com/diy-furniture-outdoor-cushion-covers
Step 2
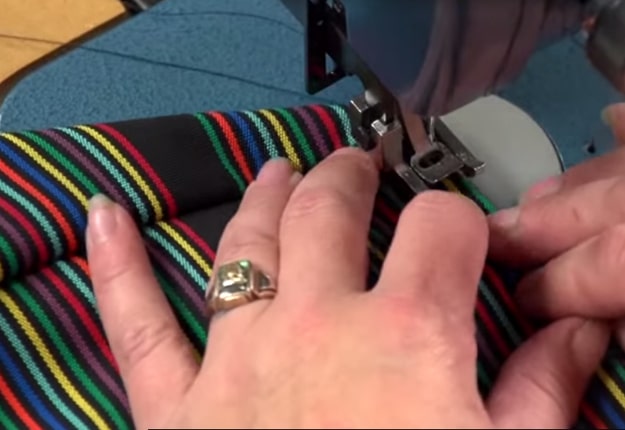
Position the assembly so the stitch starts about ½” away from the sides’ corner and about 3/8” away from the folded edge.
When you reach the next corner, stop about a ½” away and do some reversing. To move on to the next edge, we will not even cut the threads but we will simply remove the needle from the fabric, lift the flute, reposition the assembly and sew on to the next corner.
Once the plate and boxing are sewn and now we can move on to the opposite side. When sewing this, do not finish or sew the side that is left open for the insertion of the foam or pillow insert. It will be sewn shut in a later step. And now we are ready to insert the cushion.
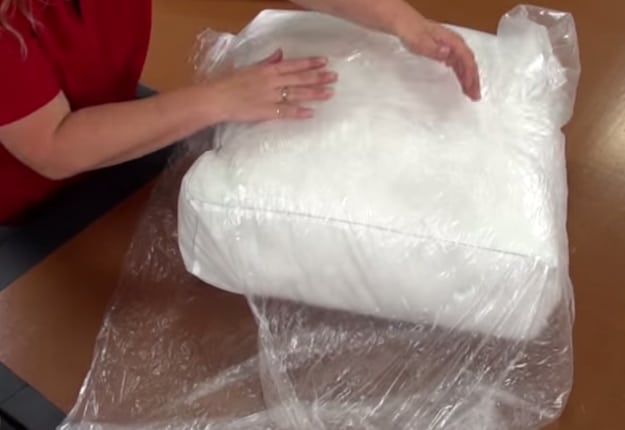
Build a pillow insert from the spun bonded fabric. The construction of the pillow insert is done the same way you build the cover you will not be sewing the mattress style seam in this.
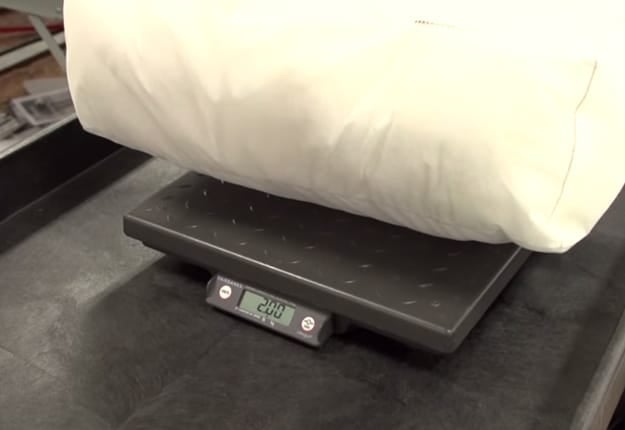
Fill the pillow insert with fiber fill until it’s plump. We recommend a stuffing of about 2lbs for a cushion measuring 20” x 20” x 5”. The amount of fiber fill used is completely up to you.
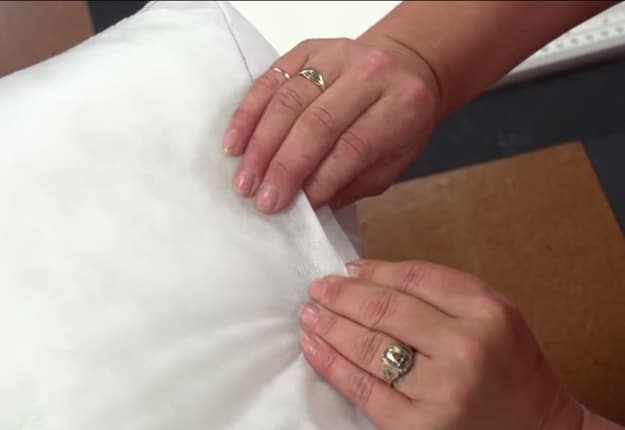
When the pillow insert is stuffed to your satisfaction, we can now close the opening with the single stitch ensuring a reverse stitch is made at the end and beginning.
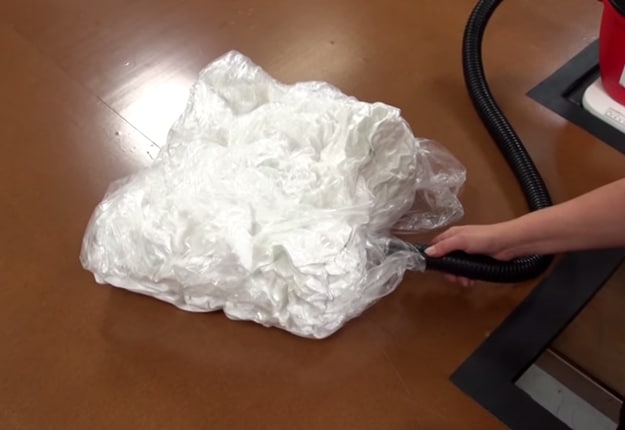
Insert the cushion with the vacuum still on. Once done, you can turn off the vacuum and watch the pillow slowly expand. You can leave the silk film inside to render your cushion water resistant.
To sew the opening, create a folded hem to simulate the rest of the sides of the cushion. Fold the fabric in along with the edges of the fabric and start sewing about ½” from the corner and 3/8” from the folded edge. With the fiber fill stuffing closing, sewing up the opening is not too difficult.