Pariwisata tidak hanya melulu berkaitan dengan pantai ataupun tempat wisata lain pada suatu daerah. Kuliner juga menjadi pilihan utama bagi para wisatawan yang memang senang berpariwisata ditempat-tempat yang memang lain dari daerah asalnya. Tidak hanya berpariwisata ketempat-tempat bersejarah, wisata kuliner dirasa penting untuk menyempurnakan liburan atau traveling anda.
Mungkin pariwisata yang dilakukan didaerah barat Indonesia memang sudah terkenal dengan pariwisatanya. Apakah anda pernah mencoba mendatangi daerah dibagian Tenggara Indonesia?
Gorontalo adalah bagian Indonesia yang terletak dibagian tenggara. Gorontalo memang masih asing ditelinga para wisatawan yang memang suka berlibur ke daerah-daerah yang memiliki panorama yang indah. Saya sebagai masayarakat yang memang lahir di Gorontalo, merekomendasikan tempat ini sebagai satu tujuan tempat wisata anda. Banyak sekali yang bisa kita explore dari Provinsi ke 32 ini.
Terutama Kulinernya.. Hmm.. Jika anda suka dengan makanan yang pedas, cobalah berwisata kuliner dikota ini. Lidah anda akan dimanjakan oleh rasa pedas yang belum pernah anda bayangkan. Mungkin di pikiran anda daerah Manadolah yang memiliki makanan dengan label raja pedas di Pulau Sulawesi.
Ini tidak bisa dibilang salah juga, memang taste dari Manado dan Gorontalo tidak berbeda jauh. Kali ini saya akan berbagi informasi tentang kuliner di Gorontalo yang sudah pasti direkomendasikan oleh wisatawan yang sudah pernah berkunjung ke Gorontalo, termasuk saya.
Kuliner ini bernama Binte Biluhuta . Binte Biluhuta atau yang dalam artinya adalah Jagung Siram ini merupakan sup yang terdiri dari jagung dan ikan. Makanan ini memang disajikan saat masih panas dan memang cocok untuk dimakan pada saat cuaca dingin.
Makanan ini biasanya berisikan Kelapa parut,daun bawang, ikan tuna yang disuwir dan tentu saja jagung yang menjadi bahan utamanya. Memang jika belum dibumbui rasanya sedikit tawar, tetapi kita bisa membumbuinya sesuai dengan selera masing-masing. Dengan bumbu tambahan garam, Perasan Jeruk Nipis, Kecap dan Sambal yang super pedas. Tenang, jika anda memang tidak suka dengan makanan pedas, anda tidak perlu membubuhkan sambal di mangkuk anda.
Bagi anda yang penasaran, silakan dicoba.
Untuk anda yang memang belum bisa mengunjungi kota Gorontalo, tidak usah khawatir saya akan mencantumkan bagaimana cara membuatnya agar anda bisa membuatnya dirumah tanpa harus pergi kemana-mana.
Original article and pictures take http://hms270rinynovita.wordpress.com/tugas/tugas-5/bintebiluhuta/ site
Bending Wood the Wright Way - Popular Woodworking Magazine
Spread the glue on the surface of each strip with a 3/8"-32 threaded rod to draw the adhesive out as evenly as possible. Note that I’ve placed the strip on a long scrap to elevate it above the bench. This allows the extra glue to drip over the edge.
In my mind, there are three classifications of woodworking techniques. There are many that I classify as “useful,” a smaller number that I think of as “indispensable,” and then a very few that represent a true breakthrough in woodworking technology. Bending wood is one of the latter.
The ability to alter the grain direction as our imagination dictates while preserving the strength inherent in a straight piece of wood allows us to create the elegant beauty of a continuous-arm Windsor chair and the inspiring sweep of a vaulted ceiling. We first explored our world in sailing ships with bent wood hulls, then left it in airplanes with bent wood wings. Our world would be much less beautiful and much less exciting without this simple woodworking technique.
I’m currently engaged in a woodworking project designed to create a little excitement, and bending wood is at the very heart of it. I’m part of a group of historians and aviators who are recreating the six experimental airplanes of the Wright brothers, beginning with their model glider of 1899 and ending with the 1905 Wright Flyer 3, the first practical airplane. The frames of these primitive aircraft are a collection of bent wood parts — ribs, wing ends, braces and skids — ingeniously arranged to catch the wind and lift a man into the air.
True Geniuses Prefer Cold Bending
Clamp the laminated strips in the bending form, spacing the clamps every 3" — dead center in the middle of each segment of the press. I drilled 1?"-diameter holes in the form to hold the top face of the clamps and automatically space them.
When most of us hear the words “bending wood,” we think of steam bending. The wood is heated briefly in low-pressure steam to soften the lignin (a glue-like protein that holds the cellulose fibers together). While the wood is still hot, it’s clamped into a bending form. The cellulose fibers telescope to conform to the curve, and the lignin cools to hold them in place. Or almost. In actual practice, the fibers never quite conform, and when you remove the wood from the bending form, there is a great deal of springback — the wood loses some of its curve. If the wood is not attached to the other parts in the project so as to hold the curve, it may continue to relax and it will spring back even more. This problem plagued the Wright brothers while they were doing their glider experiments — they calculated precise curves for the ribs to fly as efficiently as possible, only to have the ribs relax and lose a good deal of curvature before they could get their gliders in the air.
To solve this problem, they eventually abandoned steam bending for an early form of cold bending. They arranged the parts of the ribs for their Flyers in a bending form, then nailed them together with brads. They could not use glue — the adhesives 100 years ago were not weatherproof. A good rain and the wings would have come apart.
Fortunately, we have a much larger and more reliable selection of adhesives to choose from than the Wrights. We decided to make the bent wood ribs of our replica Wright gliders by laminating the parts with a water-resistant aliphatic resin (yellow) glue. You could also use Resorcinol, epoxy or polyurethane glue for an application like ours. If your project won’t be exposed to the weather, you can use almost any good wood glue.
Before you tighten the clamps, just snug them up to hold the stock against the form. With a scrap of wood and a hammer, tap the top edges of the strips to even them up. Then tighten the clamps until the gaps disappear between the laminations.
To cold-bend wood, first resaw your stock into thin strips and plane it so the thickness is even. The thickness of the strips depends to a large extent on the radius of the curve. The tighter the radius, the thinner the strips. I use this chart as a jumping-off point:
• 2″ to 4″ radius — 3/32″ thick
• 4″ to 8″ radius — 1/8″ thick
• 8″ to 12″ radius — 3/16″ thick
• 12″ radius or larger — 1/4″ thick
There are other factors to consider: the species of wood, the slope of the grain (as it runs between the faces of the strips), the strength you want, and the amount of springback you can tolerate. For maximum strength and minimum springback, we decided to glue up the ribs from 1/8″-thick strips, although the radius of the curve was nowhere near 8″.
Stack the strips as you will glue them together. If you use strips that were all resawn from the same board, flip every other strip end for end to reverse the grain slope. Spread a thin layer of glue on the face of one strip, lay the next strip on top of it, spread more glue and repeat. If you’re laminating a large number of strips, you may want to choose an adhesive with an extended working time.
Before the glue sets, clamp the laminated strip in the bending form. Let the glue set up for its full clamp time. If you’re not sure of the clamp time, wait a full day before you remove the assembly from the bending form. As you release the clamps, there will be a small amount of springback. If the curve is critical (as it was for our glider ribs) make the curves in the bending form slightly tighter to compensate.
Making a Cold Bending Form
Pretty simple, huh? The only real trick to cold bending is in making a form that will apply an even clamping pressure all along the laminated assembly. Traditional bending forms consist of two parts, the form (the positive shape) and the press (the negative shape). Both of these parts are normally cut from the same stock. Begin by drawing the curve you want on the face of the stock. Cut the curve with a band saw, separating the stock into two parts. On the negative part, mark the thickness of the bent wood part. (Tip: Use a compass like a calipers, set it to the desired thickness. Follow the curve with the point of the compass, marking the thickness with the scribe.) Cut away the thickness on the band saw — this will create the press.
The trouble with this traditional bending form is that the press doesn’t compensate for small variations in the thickness of the laminated stock or a band saw blade that wanders a hair off the line. Consequently when you apply the clamps, the clamping pressure may not be completely even all along the form. This may result in weak laminations or even gaps between the laminations when the glue dries.
To ensure that this didn’t happen to our glider ribs, I designed a compensating press. After cutting away the thickness of the bent wood part, use the compass to mark yet another curve on the negative part, this one 1″ larger in radius than the curve you just cut. Saw this curve then cut the 1″-thick piece into 3″-long segments. Adhere the segments back to the negative part temporarily with double-face carpet tape. Glue a strip of canvas to the inside curve of the segments and cover the canvas with 6-mil plastic.
When you separate the segments from the negative part and discard the tape, they should be held together by the canvas like the tambours of a rolltop desk. This is your press. When you squeeze the laminated stock to the form, arrange the clamps in the middle of each segment; this will compensate for any variation in stock thickness or inaccuracies in the bending form and keep the clamping pressure relatively even.
Note: The plastic on the press will keep any glue that squeezes out from between the laminations from sticking to
the canvas. To prevent the squeeze-out from sticking to the form, apply paste wax to the form before each glue-up.
Spreading the Glue
Just as uneven clamping pressure will reduce the strength of the lamination, so will an uneven application of glue. You must spread it as evenly as possible, and I’ve got just the ticket. This little trick was shown to me by the good folks at Franklin International (makers of Titebond glue). Get rid of your glue brushes and spread the glue with the teeth of a 3/8″ x 32 threaded rod. The threads spread the glue to just the right thickness (about 0.005″) for a strong joint with a minimum of squeeze-out. For this particular project, I mounted a short length of threaded rod in a wooden handle. Between glue-ups, I keep the rod submersed in water to prevent the glue from drying on the threads. PW
Nick Engler is a contributing editor for Popular Woodworking.
Original article and pictures take http://www.popularwoodworking.com/techniques/bending_wood_the_wright_way site
Another detail that I adored in this shoot are the thoughtful destination wedding welcome boxes. Welcome bags (or boxes) are an absolute must for destination weddings and this one is filled to the brim with an array of goodies!
Kick off those shoes chicks, this bohemian wedding will have you wishing for some green grass to wiggle your toes in. From the bride's barefoot sandals to their gorgeous and organic certified venue, Barr Mansion, Liz and Jay's big day is a can't miss!
Those barefoot sandals were the bane of my existence in the weeks leading up to the wedding. I wanted them so badly but it was difficult trying to get them shipped in time from Turkey from someone who didn't speak English. They arrived in San Antonio as I was walking out the door to drive to Austin at the last minute possible, and ended up being my absolute favorite detail of the day.
It was a whirlwind of a day! It was everything I dreamed it would be after two years of planning, it was almost an out of body experience. To see everything we had been imagining actually playing out, with some champagne in hand, was the most cathartic experience of my life. It felt amazing to finally be enjoying our friends and family at that beautiful venue.
My niece the flower girl had a meltdown right before she was supposed to walk out because she didn't want to go alone... so my brother had to run in and carry her out from the side inside of down the aisle. I heard he did a great job of throwing the petals though! My aunt officiating the ceremony was really special to me as well. I spent all my childhood summers visiting her and my grandparents in Brooklyn.
Words from the Vendors
From Day 7 Photography:This beautiful couple was the definition of "bohemian chic," and I especially loved that the bride went barefoot for her wedding. Their venue, Barr Mansion, is the only organic certified venue in the nation, which fit
perfectly with their love for the earth and the outdoors.
From the Bride
I really loved looking at the baby pictures on all the tables of Jay and I. I hadn't seen Jay's and vice versa, so it was fun to look together.
I loved Jay's Sooner cake! Barr Mansion only uses organic materials and they emailed me a week before saying the cake may be purplish instead of crimson because they would use beet juice. If there was only one thing that could upset Jay on the wedding day it would be having an A&M colored OU cake instead of the proper crimson! So we had the decoration brought down from Okalahoma with Jay's parents, and it was perfect.
Get in on the organic action and see how this romantic day was captured by O Brown Studio below!
http://youtu.be/4FWHpu6yq2M
Original article and pictures take http://www.weddingchicks.com/2014/08/12/bare-feet-boho-wedding/ site
I saw these a while ago on A Little Learning for Two and have been waiting for the right time to try it. Since we were already on the subject of transportation this week I figured this would be a good time!
Our supplies included a container for the boat, hole punch, straw, rubber band, balloon, and hot glue. I started with 2 plastic mushroom containers.
They had low sides and flat bottoms, so I figured they would be pretty stable. I used a hole punch to make a hole in one of the short sides of each boat.
Then I took a balloon and rubber banded it onto a
straw,
I stuck the straw through the hole in the boat with the balloon on the inside of the boat.
Then I hot glued around it on both sides (A Little Learning for Two used blue tack, but the best I had was hot glue). Excuse the poor glue job; it was hard for me to get around the straw!
Once they were dry, I filled the pool up a little, and we headed outside to try them out. At first I blew up the balloons and the girls took them, holding the straws tightly, and released them in the water. They enjoyed watching them go. It did take them a little while to figure out that the air from the balloon was what was making the boats move.
Bria figured out how to blow up her own balloon!
I hadn't bothered to blow the pool up completely before filling it figuring we would just put it away after this. This was much too inviting for Eli though, and before I knew it he was soaked! Of course, the girls had to join in.
Original article and pictures take http://lifewithmoorebabies.blogspot.com/2012/09/balloon-boats.html site
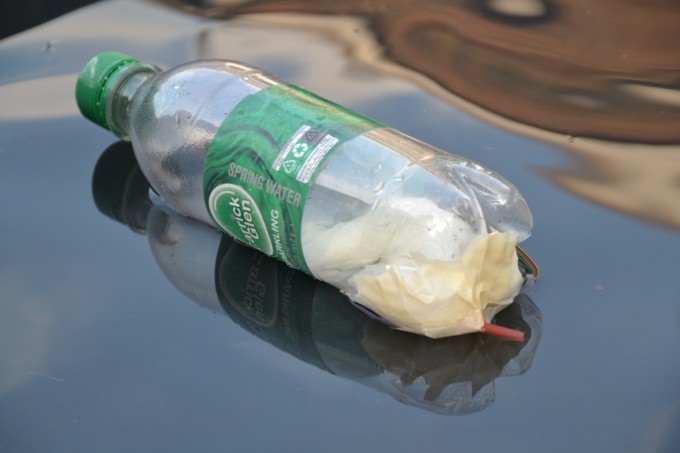
Baking Soda Experiments - baking soda powered boat
Method
Pierce a hole in the non lid end of the water bottle and poke the straw through, I trimmed mine so only used about one third of the length. Tape around the gap to prevent air escaping and keep the straw in place.
Carefully pour some vinegar into the bottle and replace the lid.
Pour some baking soda onto a small piece of kitchen roll and roll
it up.
Stand over your water, stuff the tissue wrapped baking soda into the bottle and quickly add the lid.
Place in the water and watch it go.
Can you see the bubbles coming out of the end?
The Science bit
Vinegar (an acid ) and bicarbonate of soda ( an alkali ) react together to neutralise each other. This reaction releases carbon dioxide a gas which is the bubbles you see.
The force of the movement of the carbon dioxide backwards causes a reaction force which pushes the boat forwards.
Can you think of any other forces which might affect the movement of the boat? How about wind? Or movement of the water if it was disturbed as the boat was placed onto it.